The fragility of fine porcelain figurines is certainly part of their beauty, but that same attribute can make them tricky to clean, if and when that’s needed.
In reality it’s ‘when’ rather than ‘if’, because one of the Great Mysteries of Everyday Life is how something can get so incredibly dusty even though kept inside a curio cabinet that’s rarely opened. Here are some tips for cleaning porcelains, whether the issue is ordinary household dust or something more challenging.
Household Dust
Dealing with a light coating of basic household dust is the easiest because the figurine can be dry cleaned – no pun intended. This is the same fine white dust that appears on your dark wood furniture, and on your index finger if you decide to write Dust Me in it as a gentle reminder to the ‘household staff’, whomever that might be. (In my house, that’d be moi.) This kind of dust rarely contains oils or grime.
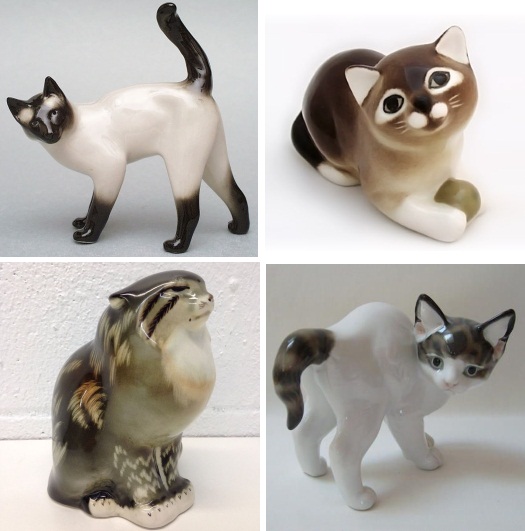 A glazed figure made from a simple mold and with no delicate decorations, like these Lomonosov porcelain cats, can be simply wiped off with a clean cloth or a Swiffer.
 If the figure’s surface is bisque (matte) porcelain, it’s better to use a brush instead. Any type of napped cloth will ‘catch’ a little on the less-than-glassy-smooth surface of the porcelain and may leave tiny particles of lint; a Swiffer is even worse. If the figure has a textured or detailed surface, like this Connoisseur Snowflake kitten, a gentle but thorough brushing will remove dust from all those nooks and crannies. A soft brush, such as a shaving or makeup brush, is good for large areas; it should be kept for this use and nothing else.

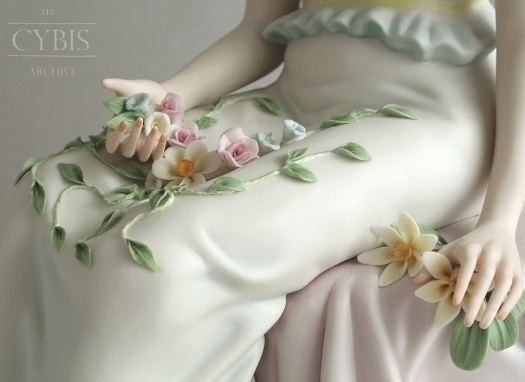 Items with fragile details like the flowers and leaves can be “dry dusted” using soft paintbrushes in various sizes. You wouldn’t use a shaving or blusher brush on these areas, because you want to avoid applying undue pressure that may break off any of the delicate elements. Shown above is a Cybis Dahlia and part of the original edition of Persephone.
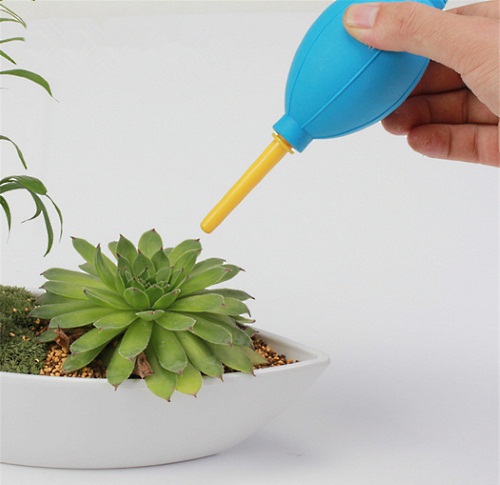 An alternative method is to use air instead, which has the advantage of being touchless. A handheld bulb duster is the safest, even though you will probably need to ‘poof’ at a given area more than once.
Please do not use a can of ‘compressed air’, sold as a handy method to clean computer keyboards and such! Not only is it easy to hold the can too close and thus deliver a blast of air that could break very tiny decorations, but those cans contain more than just air. They also contain a propellant: propane, butane, or HFC-134a (tetroflouroethane, for the science nerds amongst us.) Most also contain a ‘bitterant’ in order to make the air unpalatable to those who may try to get high by inhaling the compressed air directly. These bitterant additives are not only bad-tasting but also leave a residue. Don’t use canned air!
If Your Figurine is Unglazed and Has Color…
 The good news is that the next paragraph does not apply to glazed figures, nor to any completely-white bisque figure that has no color on it whatsoever (like this 1950s Cybis Holy Family). But if your porcelain is bisque (unglazed) and has any kind of color on it, read this heads-up:
It’s true that any paint on unglazed (bisque) porcelain figurines does become colorfast during the firing process. However, at many studios, if the final inspection of a piece revealed any painted areas that perhaps did not emerge 100% as was intended, it was common practice for such areas to be touched up. But because those pieces were not returned to the kiln for an additional firing, the touched-up areas are not colorfast. And because the surface is matte, it’s impossible to tell the difference between fired and non-fired paint. Any non-fired paint can be affected by cleaning, sometimes even only by wiping with plain water if the touch-up paint was water-based. So, there is always a chance that there might be non-fired ‘factory-touched-up’ areas on any given piece. The percentage of these, compared to that figure’s overall production, is probably small but it’s best to be aware that this practice was common.
Grimy Dust, and Worse
If a porcelain figurine has not been kept behind glass, it may have accumulated grimy dust which is typically gray, black, or brown – the latter is especially likely if smoking took place in the environment. Even in non-smoking places, tiny airborne particles containing grease, oils or smoke from cooking have to land somewhere. Sometimes there is simply outright dirt. Removing any of these things requires a wet cleaning, and that’s when things get can get dicey.
I first test the overall cleanliness of a piece by dampening a Q-tip, running it across a bar of mild glycerin soap, and then gently rubbing a couple of small areas that are either horizontal or almost so. The resulting color of the Q-tip tells me the level of dirt I’m dealing with: If there’s no black, gray, or brown on it, there’s probably just household dust. But what if there is grime?
 The Cybis studio used to enclose this ‘how to care for’ card inside their original boxes. The advice is basically sound, although I would add a few important caveats:
- Be very careful of water temperature because their “warm” is too vague. Better to err on the side of cooler. This is because some of their small delicate decorations were attached with glue rather than with porcelain ‘slip’, and water that is too warm (how warm is too warm? Nobody really knows…) can soften the glue and result in the decoration falling off. The glue on vintage pieces is especially susceptible to this because it has dehydrated over the years.
- Their instructions assume a fairly deep sink that is filled almost to the top with water. Even though they recommend lining the sink with a heavy towel, an accidental ‘hit’ on that surface could still damage the item.
- Setting a larger piece on several thicknesses of towel can compromise its stability, so you may want to keep one hand at the ready to stabilize it if need be.
- I’ll comment on their “wood base” instruction later.
Personally, I have never been a fan of the ‘dip’ method because I was always afraid I’d misjudge the distance between porcelain and sink bottom, especially through a layer of soapsuds. So, I typically use the much more tedious soapy-Q-tip method. I start at the top of the piece and work downward in small sections, using either a Q-tip or a very small make-up sponge wedge (for large areas.) The wedge does have the advantage of being re-usable but unless it is white, does not give as good an idea of cleaning progress as a Q-tip does. Yes, many cotton swabs are sacrificed in this way but if I do see any paint coming off at any point, I can immediately stop consider whether or not I want to continue cleaning that area. If I had dunked or sprayed the piece, it might be too late.
The disadvantage to the cotton-swab method is that it’s too risky to use on small delicate decorations like tiny flowers and leaves. Poking at a ¼-inch-diameter flower with a cotton swab is not likely to end well. This is where spraying comes in.
A collector friend of mine uses the spray method exclusively, and has promised a how-to YouTube video on his channel, to which I will link here after it is uploaded. Basically, it’s the same as the Cybis recommendation but with one difference: He uses Formula 409 instead of a mild-soap-and-water solution, and swears by it. I do part company with him on that, because I’ve seen how easily even mild soap can remove unfired paint, and – again, speaking only for myself – would not want to risk accidentally losing any of the color(s) on a piece of my porcelain. That said, he reports that he’s never had that happen to any piece that he has cleaned. So, it boils down to a case of “Do you feel lucky?” when using something as strong as Formula 409. It does work like gangbusters on dirt, though.

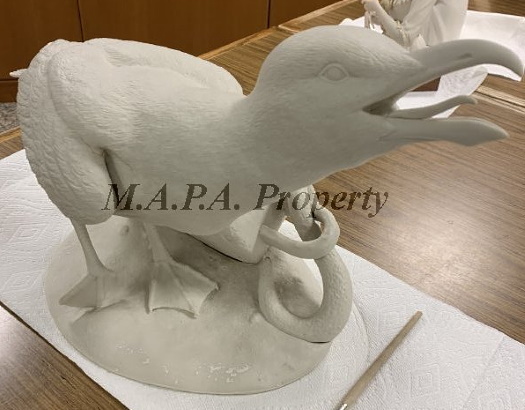
 Here is a Cybis white bisque Seagull, although you wouldn’t know it for sure under all that grime! This had been stored for many years on a shelf in the Cybis building with a badly leaking roof and other poor environmental conditions. A mixture of dirt, water, wet wood, and tar residue dripped down onto the porcelains every time it rained. Because this piece has no paint, it was the a perfect candidate for wet cleaning.
 Voilà! No more Dirty Bird! Didn’t the Museum of American Porcelain Art do a great job cleaning him?
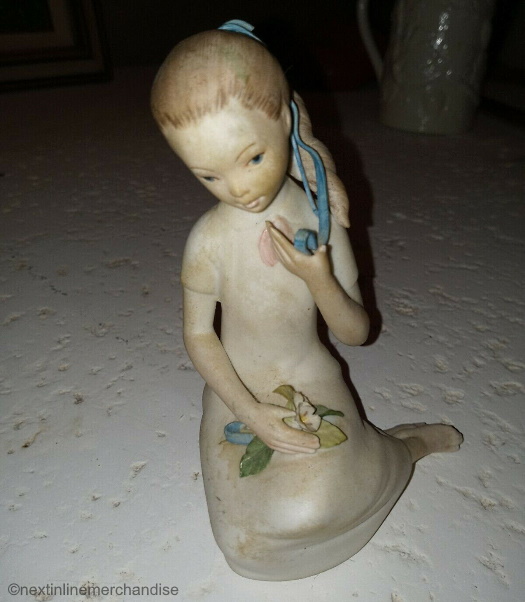 Here is a simple figure (Springtime) that has color, delicate flowers, leaves, and hair ribbons. What a mess! Judging by the color of the grime, it’s probable that she was kept in a proverbial smoke-filled room.
 Not the same piece but a clean version, to illustrate how Springtime normally looks. The dirty one was sold on eBay years ago and yes, the seller really did list it like that. A small piece like this one (5” high) can be either dunked carefully or sprayed down. Other than her hair ribbons and little bouquet, the rest of this piece is also wipe-able.
Numbered Limited-Edition Porcelains
Another area needing some caution is the individual sculpture number that was applied to limited edition pieces by the porcelain studio. The hand-painted sculpture number was the last step before sending the piece out to the retailer and so that paint is unfired. Thus, it can be accidentally smudged or even entirely removed by careless ‘wet’ cleaning. On some pieces this area is on the underside, which does not normally get dirty, but some studios preferred to have their signature and/or number always visible.
 The signature area on this Cybis Queen of Sheba was applied in two steps. The Cybis signature, USA, copyright symbol and copyright year may have been applied at the same time as the gold areas and fired along with that paint color as the final step. But the sculpture number (111) was applied later and was never fired. You can see the difference in the paint that was used.
 In contrast, all elements of this backstamp were fired on as decals except for the sculpture number (24) which would be colorfast only if a permanent-ink pen was used to apply it. Most porcelain studios used decals for most backstamp elements but Cybis and a few smaller studios such as Kazmar eschewed them entirely. Burgues used paint for his also, except for his logo which was a decal.
Decal elements are permanently burned into the porcelain during a firing. But any hand-applied sculpture numbers, edition sizes, and (sometimes) names are only on the surface and can be affected by cleaning.
Figures with Wood Bases
Porcelains that are attached to a wood base present an additional challenge because wood and moisture are natural enemies. If water is dripping down a sprayed figure (gravity does work!) it can be difficult to keep some of it from collecting at the very base, where it actually sits upon the wood.
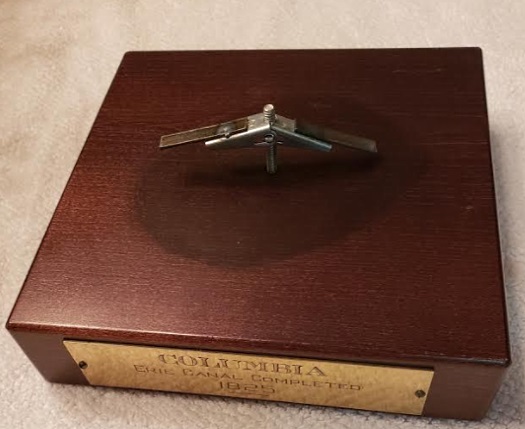 If the porcelain’s mold had a large enough surface area at the bottom, a toggle bolt was often the method of choice; the bolt extends up through the wood, into the hollow interior of the porcelain, and acts like the molly bolts that are used to securely put screws into drywall. The hole in the underside of the base would then be covered by a glued-on layer of felt. In this photo you can see the darker, non-oxidized area of wood that had been covered by the porcelain sculpture atop it. That was the base’s original color, before long-term exposure to light.
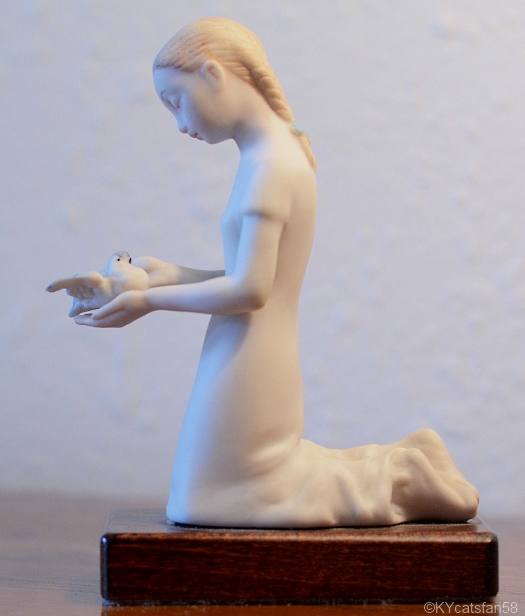 Small base-mounted sculptures, like First Flight which is only 4.5” high overall, were simply glued into place.
A toggle-bolted, on-base piece can usually be held upside-down over a sink or bucket while being carefully dunked or sprayed. Take care to prevent any water from dripping down onto the wood when the piece is placed upright again. The small area where the porcelain joins the wood can be carefully cleaned with a barely dampened cotton swab if it is noticeably dirty.
Larger wood-base pieces can either be cleaned entirely via the cotton-swab method, which presents no danger to the wood, or spraying while upright if the porcelain/wood juncture is securely covered. The best way to do that is to shield that area by wrapping it snugly in plastic wrap such as Saran, and then extending that waterproof covering over the rest of the wood base, covering or wrapping the base’s top and sides. The idea is to ensure that when liquid runs down the porcelain, it flows harmlessly along the top of the plastic wrap and away. You don’t want it to pool anywhere on or next to the wood. Wrap it snugly and perhaps add a second layer of plastic wrap as insurance. The Cybis instruction sheet seems to recommend a heavy towel as a second layer of protection around the base but of course that wouldn’t be waterproof; it also might not remain in place very well.

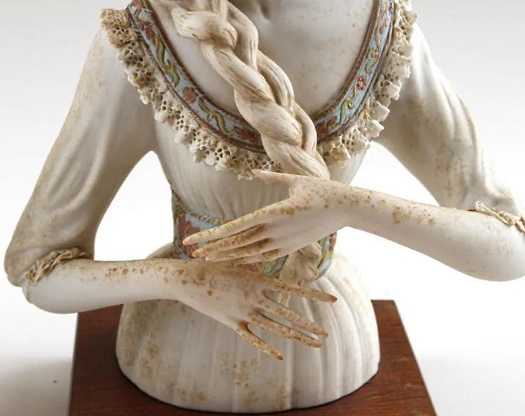 In the same liquidation auction as the Cybis seagull was this truly filthy example of their 1960s Guenevere bust. She looks as if she has been making mud pies! Sadly, she suffered the same poor storage conditions as the seagull but is complicated by having a wood base and dipped-lace trim on her dress collar and cuffs.
 And here she is, after cleaning; an amazing difference. Again the Museum did a wonderful job and I thank them for sharing these photos!
Dipped Lace and Spaghetti Poodles
The biggest clean-up challenge is presented by items decorated with dipped lace or porcelain ‘spaghetti’ because not only can dirt settle deep into all those tiny spaces but they are often intolerant of any pressure being applied to them.
Dipped lace started out as real pieces of lace that were applied to a piece of porcelain greenware after being coated with a thin layer of porcelain ‘slip’. When the item was fired, the lace burned away in the kiln, leaving the hard porcelain-coating layer behind. The extent of such lace decoration can be as simple as a single row on a collar, cuff or hem, or as extensive as multiple layers forming the outside of a figure’s gown. Several European factories (Meissen, Dresden, Irish Dresden) became known for this; during the 1940s, the Cordey China Company regularly used dipped lace on their human figures , although rarely to the extent (per piece) that the European makers did.


 From top: Sitzendorf Dresden lady; Irish Dresden lady; pair of Cordey gentlemen with lace trim and hand-formed hair ringlets. An upside to cleaning Cordey figures is that they were always glazed, and thus no worries about non-fired touched-up areas! A downside is that they were also used as lamp bases, which meant that a truly thorough cleaning would require disassembly.
Most people recommend using the dunk-in-bucket method to clean such Dresden-style pieces – if you can find a totally-not-lacy part of the figure by which to securely hold it!


 There’s an entire collecting genre devoted to the ‘spaghetti’ dogs and cats that were wildly popular during the 1940s and 1950s. Most of these items were made in either Italy or Japan. The decoration style is usually one of these three, which – not being a collector myself but merely an observer – I would describe as (from top to bottom) ‘spaghetti’, ‘fat curls’ and ‘tufted.’ The general recommendation seems to be to use a soft toothbrush dipped in mild soapy water to clean these, then rinse and allow to dry for an extended period. I’m not sure how safe that would be for the ‘spaghetti’ style, though!
What Not to Do
As you can see, the size and style of a given piece of porcelain, plus one’s tolerance for tedious detail work, combine to determine the optimal cleaning method. However, there are two things that you should definitely NOT do:
(1) Never use anything abrasive (no, not even Bon Ami) to clean a piece of porcelain. Firing makes the paint colorfast, but it is still basically only on the surface. If you abrade that surface, you will take some of the paint off as well.
(2) It is generally recommended to never use any cleaning agent that contains bleach, peroxide, or ammonia. The first two are bleaching agents; that’s self-explanatory. “Colorfast” does not mean “bleach-proof”. Ordinary household ammonia is ammonium hydroxide, which is very effective at breaking down dirt, grease and oils. The related compound in spray cleaners such as Formula 409 is a form of ammonium chloride. It is reportedly more acidic than household ammonia but of course 409 has other ingredients in it as well. My personal philosophy is that when cleaning something as delicate as porcelain, the safest policy is to avoid a witch’s brew of chemicals.
It’s also important to make sure that the inside of non-base-mounted porcelain figures is completely dry before you return them to their usual place. There is always a firing hole somewhere (usually on the underside) and there may even be very tiny additional firing holes on the surface that liquid can get into if you dunk or spray. If you can put the cleaned porcelain figurine on something that will allow air to circulate beneath and within it for a day (perhaps a cooling rack that you normally use when making cakes or cookies), that should do the trick. Your nice wood display shelf will thank you!
[This post originally appeared on my personal blog site in 2021, and has been relocated here.]
Name Index of Cybis Sculptures
Visual Index (for human figures/busts only)
About the Cybis Reference Archive
What is Cybis?
Images of Cybis porcelains are provided for informational and educational purposes only. All photographs are copyrighted by their owner as indicated via watermark and are used here only as reference material. Please see the Copyright Notice in the footer and sidebar for important information regarding the text that appears within this website.
The Cybis Archive is a continually-updated website that provides the most comprehensive range of information about Cybis within a single source. It is not and never has been part of the Cybis Porcelain studio, which is no longer in business.
