Few things are more disheartening than to see a lovely porcelain sculpture emerge from its shipping or ‘moving’ box with breakage. Whether you are sending, receiving, or simply moving such an item from one residence to another, there is plenty of how-to packing information on the internet. The problem is that some of it is wrong, and can easily result in disappointment.
Why Packing is Important
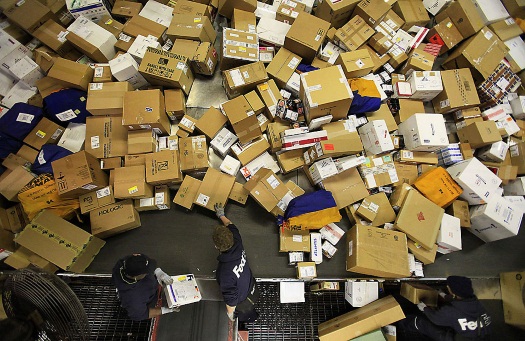
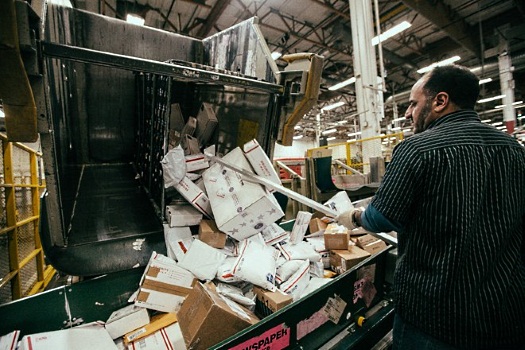
If anyone has any illusions about the dangers that fragile items encounter during transport, the photos below of the three major carriers’ distribution facilities should dispel them:


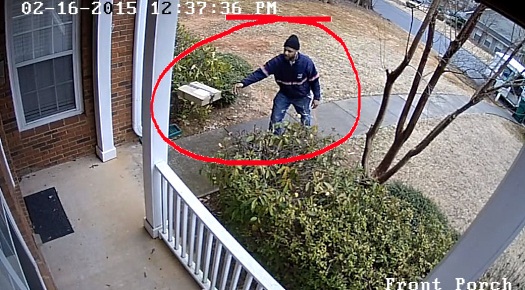
And of course there are the too-frequent instances of Deliverers Behaving Badly:


When you are moving fragile items from one house to another it’s always advisable to NOT trust them to the “tender mercies” of a moving company if at all possible…. even if you need to accomplish that by renting a small cargo van (or better yet, a minivan with the rear seats removed if needed, for an even smoother ride) to pack up, drive, and unload yourself.
Update, December 2023: I recently became aware of a practice called ‘re-packing’ by at least two major carriers (FedEx and UPS). If the original packaging is damaged en route, the carrier can – at any point during the transit from sender to receiver – opt to ‘re-pack’ the parcel. Sometimes this decision is made by the driver if something untoward happens before the actual delivery (such as a heavy box being loaded atop a lightweight or too-thin one.) The damaged parcel is set aside as a ‘re-pack’ and returned to the distribution hub at the end of the day. The personnel there will open (or possibly replace) the box and re-pack the contents in whatever way they choose. They may or may not know what they are doing or how to handle the item that you have packed. This scenario is totally unpredictable and makes it all the more imperative to initially pack a piece of porcelain in the best possible way, because you never know whether it might be re-packed by someone before it gets to its recipient!
This brings us to the critical importance of boxes. The box should be good quality heavy corrugated cardboard; please, no ‘recycled’ shoe boxes wrapped in brown paper! Amazon boxes, even if the proper size, are relatively thin in the interests of reducing shipping weight. The Uline company makes excellent shipping boxes with very good crush resistance; they can be found in stores and online.
There are three proper methods for safe packaging and their use depends in part upon exactly what the porcelain figurine itself is. While the “best” method of the three is suitable for anything, there’s a distinct difference in when the other two should be employed. These methods can be aptly termed the Mummy Wrap, the Free Float, and the Anchored Base (many thanks to a collector friend of mine for coining the first two names.)
The Mummy Wrap
This method is perfectly fine for pieces that have a simple shape with no individual delicate parts such as flowers, leaves, stems, fingers, ribbons, lace, hair ringlets, etc. Many animal sculptures are of this type.
 Although some of the above examples do have protruding elements, those are part of the mold instead of being separate attachments and are solid enough to be unlikely to break under the normal pressure of the ‘wrap’ method.
The material of choice is bubble wrap, cotton batting, or thick layers of tissue paper. My preference is for bubble wrap. Wrap the figure tightly enough so that it cannot move within the confines of the wrapping. As tempting as it may be, do not secure the wrapping material with clear packaging tape; it is not only difficult to see but a royal pain in the derriere to remove. (The one exception would be if you’re packing for a house move and the person who will be unwrapping the item is yourself; otherwise, please don’t inflict packing tape on anyone else.) Instead, use standard masking tape which has the added benefit of being inexpensive. Use enough to reliably secure the wrap; small bits or “tabs” are unlikely to hold wrap edges in place.
My friend Don gives some excellent insight as to the risks posed at the receiving end of any shipment:
A sculpture is at just as much risk, or perhaps greater risk of damage during the unpacking process as it is during the packing process (never mind the actual transfers involved during shipping). The person preparing the outbound shipment has an advantage. He or she can see what’s being wrapped and know how to handle it to avoid any damage. However, when a delicate piece arrives in bubble wrap and tape it can be a nightmare for the person on the receiving end. Unless marked, it is difficult to figure out where the top is, proper ways to hold it while trying to unwrap and so on. A single mold piece or any of minor complexity will pose no worries. However, when a shipper wraps an item that is too delicate with extruding parts, damage can and most often will happen.
When choosing a box for the Wrap method, make sure that it provides at least 3′-4″ (7.5-10 cm for my metric readers) of room between the wrapped item and the edge of the box. Sometimes people interpret the advice to “have 3 inches around the item” as meaning “around the unwrapped item”, forgetting that the wrapping itself is likely to take up at least 1″ of space, especially if it’s the large-bubble wrap. Starting with 3″ of space from the figurine alone could end up leaving less than 2″ for the other protective material…not optimal. So when using this method, wrap first and select the box second.
The Free Float
The instructions given below assume that you live in a state that has not banned the use of Styrofoam packing peanuts. As of January 1, 2022 the following states ban the sale, or use in commercial packaging, of Styrofoam/polystyrene peanuts: New Jersey, New York, Vermont, Virginia, Washington, and Washington, D.C. Several counties in Maryland have banned them as well. The so-called “biodegradable” peanuts do contain a percentage of Styrofoam and thus fall under these bans.
While the Wrap method poses no risk to a simple solid sculpture, the scenario changes when a figure has elements that are either small or intricate or applied (either in the firing process or with adhesive.) In addition to the risk of damage by impact (being dropped or something being dropped onto) there’s now the added risk of “pressure damage.” The more surface area that comes into contact with delicate sculpture elements, the greater the risk of such damage. Wrapping – with anything – greatly increases the surface area contact potential and especially when the piece is being unwrapped by someone who has no idea what’s exactly where….and may unwittingly apply pressure in the worst possible places simply by holding it. It’s much safer for the figure to be surrounded by small lightweight objects that will hold it in place without exerting a degree of pressure that could snap or break delicate components.
The standard choice for packing material is Styrofoam peanuts. In the past, some studios used excelsior (spaghetti-like softwood shavings) for this purpose but it’s not ideal; the long thin strands can very easily become entangled in delicate decorations. The Cybis studio used a special granular Styrofoam…imagine ‘couscous’ but made of Styrofoam instead. This was great stuff that posed no risk to even the most complex of decorations, with only one drawback: Its static charge and feather weight meant it was incredibly messy to deal with. It is not manufactured anymore; the closest modern approximation is the tiny Styrofoam beads used in some pillows and small stuffed toys. It can be found in craft stores such as Michael’s, A.C. Moore, JoAnn, etc. although the bags are pricey and not very large.
 This is the type of sculpture that needs the Free Float packing method because of the high breakage potential of certain areas from any pressure related to a “wrap”. Long delicate fingers, flower petals and stamens, flower stems, leaves, flower petal edges, ornate headdress elements, and a glued-on butterfly would all be at risk if wrapped.
 Although the sculpture at the far left is obviously a high-risk packing situation, don’t assume that something like the male piece is low-risk because of the total lack of flowers or furbelows; both the sword and the shield are only glued on and can easily become detached under too much pressure from wrapping. (See this post for a rogue’s gallery of the most easily damaged Cybis sculptures.)
Again thanks to my expert-packing friend Don, here are the steps to follow for sculptures such as these. I have added metric equivalents for the benefit of my European readers.
Select a box that has at least 6″ (15 cm) of clearance on all sides. If you have a sculpture that is 5″ (12.5 cm) wide you will need a box that is at minimum 17″ x 17″ x 17″. (45.5 cm square). Begin by adding 6″ (15-16 cm) of ‘peanuts’ to the bottom of the box.
Set the sculpture inside standing up on its base if the bottom is heavier. In some cases, such as the Cybis ‘Lady Macbeth’ pictured below or others like her, it is best to lay the sculpture on its back. [For figures of this shape you would select a box offering 6″ of clearance at top and bottom, thus having even more clearance along the sides.]
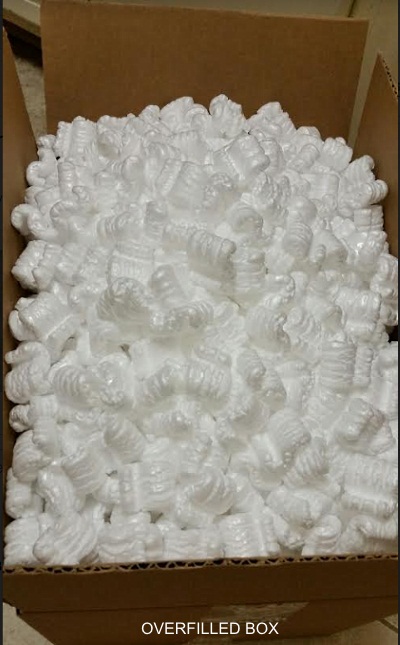
Slowly and carefully add more peanuts until the box is slightly overflowing. This is the tricky part. If filled only to the top, the peanuts will settle, just like breakfast cereal. If allowed to settle, a space will develop at the top and allow the contents inside to move around. Once a piece has room to move around, gravity will take over and the sculpture will find its way to the bottom or side of the cardboard box. Therefore, it is imperative to overfill the box, not to “overflowing” but just to the point when there is a slight bit of tension when the top flaps are closed. This slight tension “wedges” the sculpture in place for a safe ride. It is natural to fear the pressure felt when closing the flaps. The peanuts are soft and will caress the sculpture.
If the top is just slightly overfilled the flaps should meet resistance just as they are being closed. If it appears you are going to need to PUSH down with any pressure at all, you have too many peanuts. If there is no resistance when you close the top flaps, then you have too few. It’s a balancing act…
Here are photos showing some “Goldilocks” boxes: one underfilled, one overfilled, and a third which is just right!


Seal the box with tape and then note where the sculpture is located within the box. Using a black marker and write notes on the box such as, “Open here” and “Head at this end” or “Feet at this end”. Simply imagine this item is being shipped to you and now YOU have to open it. By writing helpful notes on the top of the box, you can help the person unpacking the sculpture avoid making mistakes that could result in damage during this critical process. He or she will thank you.
As a note from personal experience: Add these head/feet/etc. notes to the outside of the box even if you are packing up just to move the boxes yourself from one house or apartment to another! You may feel sure that you will remember how you packed something but trust me: Odds are that you won’t. This is especially true if you are moving more than a couple of pieces. It’s also helpful to also note the orientation of the item inside the box, such as “vertical” or “horizontal”. And if you have skimped (yes, it happens) a little bit on the depth of that top layer of peanuts, add “packed high” as an FYI reminder!
Double Boxing
To double-box or not to double-box, that is the question. ‘Best practice’ for either method (Wrap or Free Float) is to do so, but it’s often a judgment call. If you have an abundance of peanuts surrounding the figure – especially if it’s also wrapped – it may not be critical. For “self-moves”, double boxing is not necessary because you will be handling the box with care. For sellers, the value of the item being shipped will come into play as well (see special Seller notes below.) Conventional wisdom says that the outer box should be at least 4″ larger on all sides than the inner one, but this is more honored in the breach than not; many people do squeak by with a 3″ upsize and cross their fingers.
The filler material for double boxing offers more leeway than the initial packing. You could use peanuts, of course, but in this case large-bubble wrap, tightly wadded brown package paper, or (least expensive) newspaper are also perfectly acceptable (but paper is not acceptable as a figurine-wrap material.) Whatever you use needs to fill the empty space tightly enough to prevent the inner box from moving at all. The purpose of the double box is to provide a ‘moat’ of protection from outside impacts as well as from those nasty claw/grapplers than many carriers use. As shown in one of the USPS photos above, facility workers often ‘snag’ boxes in order to move them and those tools are pointy!
To Wrap or To Float?
Some figures are marginal, in that packing could be done either way, but others give some straightforward clues.
 Here are three versions of a Cybis bunny. The standard version (far left) is a perfect candidate for the Wrap method. So is the one with the Santa hat, because although the hat came from a separate mold it was either fired or securely glued in place (most likely the former) and it’s a very simple shape. For the righthand bunny, however, I would definitely use the Free Float method because the holly elements could easily be snapped off by accidental pressure either when wrapping or unwrapping. Even if I was super-careful wrapping it, the recipient might not be.
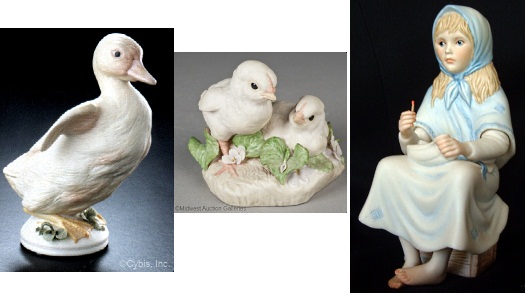 Here are a few trickier ones. Despite the leaves and stems decorating the base portion, the Duckling (left) could be carefully Wrapped – although if sending to a buyer I would attach a note to the wrapped item with instructions to unwrap that area with extreme care. The Baby Chicks ‘Downy and Lemon’ should definitely be Floated due to the flowers and leaves being so close to the edges. The Little Match Girl would be fine to Wrap except for the extremely fragile match she is holding in her hand; if selling something like this I would photograph the piece after placing it in the box (Float method) so that the recipient would be immediately alerted to this high-risk portion. Some shippers might try to ‘cocoon’ the match so that nothing whatsoever could contact it; that would work only if the cocoon/shield could be so firmly affixed to the rest of the piece that there would be ZERO chance of it coming dislodged or shifting – thereby causing the very breakage it was intended to prevent.
If you are doing a self-move, you will save yourself some packaging time and materials money by using the Free Float method for everything (depending on the cost and availability of peanuts vs. rolls of bubble-wrap.)
The Anchored Base
This method is the gold standard of packaging porcelain, and was used regularly by two porcelain studios: Connoisseur of Malvern and Lladro. Although exact techniques differ somewhat, they all share the premise that the only thing that should contact the majority of the sculpture’s surfaces is air. This requires the piece to be absolutely firmly immovably anchored to the bottom of its primary box.
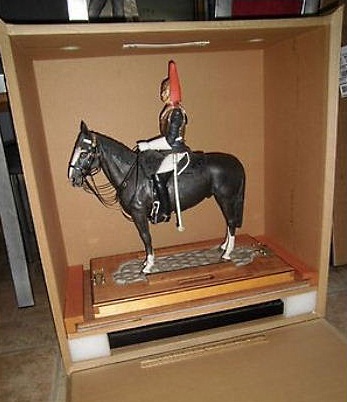 This photo shows how Connoisseur packed ‘Sefton’, one of their limited edition equestrian pieces during the 1980s. This is no mere cardboard box; it is a wooden crate. The lowest part of the box contains the separate black wood base into which the cobblestone-like base portion of the sculpture will fit when displayed. Layers of plywood separate the two sections, the topmost of which is cut to receive the piece which is then firmly anchored down with screws and wood sections on both long sides. No other part of the sculpture is contacted by anything at all; if you were to turn the crate upside down or on any side, the sculpture would remain firmly anchored in place. This is the “platinum standard” of packaging for transport.
Lladro used a version of this method, though with cardboard boxes rather than wood crates.
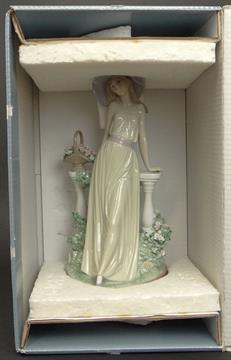 In their method the bottom of the figure was fitted into a thick Styrofoam base which was glued to a “floating floor” of corrugated cardboard. A similar layer surrounds the head of the figure, which in the example photo is wearing a wide-brim hat. Additional pieces of Styrofoam fill the voids between these sections and the box’s top and bottom, keeping them in place. (Personally I’d have used full sheets instead of just wedges.) The principle is the same: Suspend as much as possible of the figurine ‘in space’ within the box. (Clearly this was not a shipping box but would have been placed inside another.)
Instructions for a similar version of this method exist online, whereby the bottom layer is constructed from a 1/2″ thick piece of plywood cut to fit the bottom of the box, then topped by a 1″ thick sheet of Styrofoam (like Lladro used) with a recess cut out of it into which the bottom of the figurine is set. I have a few issues with that method as described, including that it advocates also using interior packaging materials which naturally defeat the entire purpose of not having anything contact the piece. For example, one part of those instructions says to “Roll small segments of bubble wrap into cylinders and place them against the figurine, in a log cabin type structure. Pay special attention to placing bubble wrap rolls between any elements of the figurine that might break and bang into another piece. Keep placing rolled bubble wrap in the box until the box is filled with rolls.” Considering that the entire rationale of using the anchored-base method is to prevent any contact at all, this method seems more likely to cause damage than avoid it. Another quibble I have with the method as outlined is the method of attaching the figurine to the base by using lengths of twine crisscrossing it and secured tightly with “skewers and tape.”
 There is a mini-version of this method, however, that is more practical. It was used by the seller from whom I purchased this piece. Although only 8″ high there are several areas at risk for damage: leaves, flower petals and stamens, several birds’ legs, and tiny claws. The seller cut an additional piece of heavy corrugated cardboard to fit the bottom of the box and then secured the base of the sculpture tightly to that piece using several plastic zip-ties. The false bottom was then glued to the inside bottom of the box, and the box was then closed (no inner packing materials). This inner box was then packed inside an outer box with about 4″ of tightly-packed peanuts around all perimeters.
I admit I blanched when I opened the inner box and saw the zip-ties, positive that “there’s no way that this could have been done without contacting any pressure-breakable areas”, but amazingly it was.
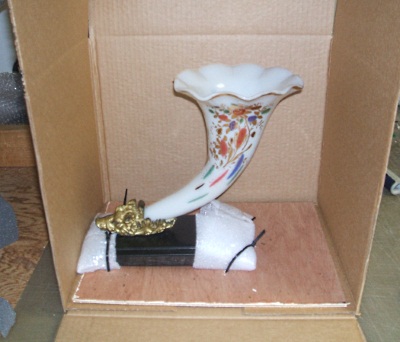 A piece like this, which has a simple strong base that can be easily anchored with zip-ties to a cut-to-fit plywood insert that is then glued to the box base, is an ideal candidate for this method. Although looking odd at first glance, it is positioned exactly right so that the largest part of the vase is centered within the empty-box space. Clearly, if the design of a porcelain figurine can safely accommodate this method of attachment, and if the packer has the time and patience to do it properly, the Anchored Base is by far the safest packing method….but it may well not be possible for many. That is why the Free Float method is a very acceptable alternative.
Soft Foam ‘Blocks’
Using solid blocks of soft foam with custom-cut openings is a method that is not often used by individual online sellers but can be a good choice depending on the item being shipped.
 This is how Boehm packed their line of ballet figures during the 1980s. You can see how the center of a single soft-foam block was ‘carved out’ to the exact outline if the figure so that there would be no shifting. Another piece with a cutout for the base section was used on top. These foam blocks were obviously manufactured to order for Boehm to match each of the sculptures; although a home seller could conceivably do something like this by hand, it would be tedious and probably not fit as well. This method is pretty much limited to figures that are composed entirely of sold-piece molds with no delicate leaves, flowers, ribbons, etc.
Multi-Piece Items
Normally you’d never ship choose to ship more than one porcelain sculpture per box, but what if the item has two separate pieces ‘by design’, as in these lidded jars? Again the best approach depends on the construction of the two elements.
 The jar at left seems to offer a couple of options. Some sellers might place a layer of white tissue paper between the top of the jar and the bottom of the lid and then secure them snugly together with crisscrossed layers of masking or painter’s tape, and then use the Mummy Wrap method. This is chancy, not only because of the tape situation but the risk of taping too tightly (with too much pressure) thus causing a crack. An even worse option would be to wrap the lid and jar separately but put them both into the same box. The best choice would be to use the Wrap method for each piece, with an appropriately sized box holding each piece and then put both into an outer shipping box.
The Rose Jar poses a problem because of the delicate flowers on the lid. Although the jar body could be wrapped, the lid definitely needs to Free Float in its own box. The tape-together option should never be considered for this one.
A Special Case: Dresden/Dipped Lace Figurines
I recently received an inquiry asking the best way to pack figures with dipped-lace porcelain, i.e., Dresden or Irish lace figurines and the like. The slightest pressure can break the delicate lace areas. I have no experience with these but reached out to someone who has, and she advised that if the free-float (attaching the no-lace base to something and using no interior packing material at all) method is not possible, the safest material would be the artificial snow that is often seen in holiday decorating. It is made of finely shredded Styrofoam; it is NOT the same as the so-called “instant fake snow” which one has to mix with water! The product for packing is similar to this and is probably available at craft stores such as JoAnn, Michaels, Hobby Lobby, etc. in the USA as well as on Amazon.
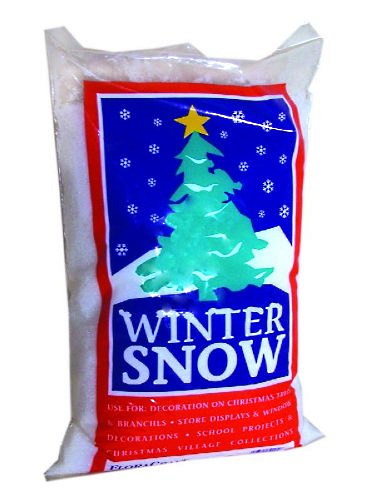 There are three drawbacks to using this for packing: (1) You will need A LOT of it even for a smallish box, so buy twice as many bags as you think you will need and then return any unopened ones (a plus for buying locally); (2) it is ridiculously messy to use because it will fly everywhere; its static electricity is off the charts; and (3) a fair percentage of it will work into the openings of the lace on the figurine, so plan to spend quite some time carefully blowing it all out after unpacking.
For Sellers and Buyers
Here are just a few quick comments aimed specifically at online sellers and buyers of porcelain or other fragile figurines.
For sellers: The more information that you can provide to your buyer/recipient, the better. In addition to marking the orientation of the figurine on the outside of the box, take a few moments to put something on a separate piece of paper at the very top of the peanuts layer or between the upper and lower top flaps. Tell the buyer whether the piece is packed upright or horizontally, and whether it is wrapped or not. In the excitement of the moment they may simply plunge hand(s) into the peanuts willy-nilly and break something off accidentally. If you’ve wrapped the piece, mark where the top is (write it on a small piece of masking tape and stick it on that area.) Mark the underside (inside) of one of the top flaps to indicate where the head of a horizontally-placed Free Floating piece is; there’s no such thing as too many reminders!
The Cybis studio and their retailers enclosed unpacking instructions within every box, advising purchasers to “carefully cut away one side of the box” and little by little remove the ‘snow’ until the majority of the sculpture could be seen, and then to carefully remove it “handling only by the base.” This was meant to avoid the plunging-hands-in-blindly scenario. A more realistic approach would be to advise the recipient that the item is located “between the center and the top” of the peanuts and to “move or remove the packing peanuts with extreme care, and do not lift out until your item is clearly visible.” If there are high-risk areas, such as bows or flowers on the back, alert them to that as well.
You are, of course, insuring the package sufficiently to cover not only the sale price but also any taxes and shipping fees as well – right? And speaking of shipping fees, please be aware that any box larger than 12″ square is likely to be charged for its Dimensional Weight rather than its Actual Weight; to avoid misunderstandings with buyers, make sure you’re estimating via the actual shipping box size for the specific piece that you are selling.
For buyers: I can state it no better than to quote my packing-pro friend Don’s advice on this subject:
Don’t assume that common sense will prevail and the seller/shipper will know what should and should not be wrapped. Take charge and demand shipping be to your specifications. After all, you are paying for it in most cases. Simply ask in advance how the sculpture will be prepared and packed for shipment. If the seller does not answer satisfactorily give him or her specific instructions. Most will be glad to accommodate as they want the sculpture to arrive safely as well.
Good (and Not So Good) Final Words of Advice
In closing, we have a piece of good (but oft neglected) advice as well as a few whopper bad ones gleaned from the internet.
The good advice concerns temperature. We often forget about the effect that ambient temperatures can have on ceramics. Yes, porcelain is the hardest ceramic but it’s still vulnerable to thermal shock. Exposure to temperature extremes, or to a rapid change in temperature from warm to cold or vice versa, can weaken porcelain internally or even make it crack outright. When I sold breakables on Etsy, I had only one instance of breakage in transit: a lovely Victorian bone china sugar and creamer set which arrived at the end of a frigid midwinter cross-country trip with two of the four pieces cracked top to bottom despite being impeccably packed. So if you are sending or receiving porcelain during extremely hot or cold spells, be aware that this is one damage factor that you cannot control via packaging.
The following porcelain-figurine-packing instructions, however well intentioned, simply don’t pass muster.
“Secure the layers of bubble wrap with clear packing tape.” [only if you want the buyer to hate you and/or possibly damage the item while unwrapping]
There are several whoppers on the U-Pack site, such as:
“Wrap each piece in bubble wrap or several sheets of packing paper.” [bubble wrap, yes; packing paper, no]
“If you have smaller items you may also want to consider dish protector sleeves.” [a thousand times no; those should only be used for flat things like, well, dishes]
“Place a layer of crushed paper at the bottom to pad the bottom of the box.” [this may be okay if you’re also going to add a properly thick layer of packing peanuts atop it; otherwise it’s a no-no. If you want to cushion the inside bottom of a box, a single sheet of bubble wrap works better.]
“Fragile items travel better standing upright than laying down” [not always, and it depends on the shape of the box vs that of the item]
“Place crumbled paper around each item to pad them.” this seems to suggest that it’s fine to put multiple fragile figurines into a shipping box. Nope! But if it’s recommending using paper instead of Styrofoam peanuts, then Double Nope.]
These from a webpage which shall be anonymous in order to protect the guilty:
“Purchase boxes that are at least one inch taller and wider than your figurines” [a one inch minimum??? Seriously?!!??]
“Cut up a Styrofoam egg carton and place one section of the container around each protruding area of the figurine. Use painter’s tape to attach the egg carton cups together….Wrap each figurine in a layer of bubble wrap.” [a layer of bubble wrap? Meaning, as in, just one? And the likelihood of the wrapping procedure dislodging any such egg-carton-bra-cup contraption is probably around 90%]
“Consider buying s-shaped peanuts, because they will interlock with one another.” [there’s no real-world evidence for them doing this and in any event, you don’t really want them to ‘interlock’ together anyway.]
And finally this pearl of wisdom from the United Van Lines website: “Do not pack a delicate china figurine in the same moving carton with cast-iron frying pans.” [gee, ya think?!?]
(This post originally appeared on my personal blog site in 2017, and has been relocated here.)
Name Index of Cybis Sculptures
Visual Index (for human figures/busts only)
About the Cybis Reference Archive
What is Cybis?
Images of Cybis porcelains are provided for informational and educational purposes only. All photographs are copyrighted by their owner as indicated via watermark and are used here only as reference material. Please see the Copyright Notice in the footer and sidebar for important information regarding the text that appears within this website.
The Cybis Archive is a continually-updated website that provides the most comprehensive range of information about Cybis within a single source. It is not and never has been part of the Cybis Porcelain studio, which is no longer in business.
